Phase 2: Host a website on AWS S3
Time for Phase 2 of the #CloudResumeChallenge, hosting the resume website on AWS.
What do I need for this?
- An AWS account.
- A domain name.
- S3 buckets.
- SSL Certificate from Amazon Certificate Manager (ACM).
- Amazon Cloudfront
Why do I need those?
An AWS Account
An account is needed because we’re trying to learn how to use the Amaz-ing Web Services platform, obviously.
A Domain Name
It’s best to use an easy to remember address when giving out your website details to people. No one can remember some address like websites-s3s-regions.aws.coms.
If you’d like to stick with full AWS services, Route53 is the way to go. You can also use another DNS provider like Namecheap, where I got mine.
S3 Buckets
We’ll need somewhere to store our website files. S3 is the tool for this job. It also allows you to allow public access so that you could technically host a basic website straight from the bucket (static-site hosting, as it is called).
❗ Be very aware when doing this (for other buckets), since it’s never a good idea to have your data accessible to the world. ❗
SSL Certificate from ACM
Since ACM enables you to create free SSL certificates for use with other AWS resources, we’ll be using this to secure access to our website. After all, everyone would like to see the 🔒 icon on the browser when visiting your website these days.
Amazon Cloudfront
Cloudfront offers a global content delivery network (CDN) for your website with integration to ACM so that you can secure your website with SSL.
This is the main reason for use of Cloudfront (to enable HTTPS for security) for this project. But having a fast website (witht eh help of CDN) is a huge bonus as well.
Let’s Get to Work
Now that we got the items we need all set, I’ll forward you to the official guide from AWS explaining step by step how to get your buckets ready, domain name pointed to the right resources, enabling Cloudfront.
Hosting Websites on S3: Example Walkthrough
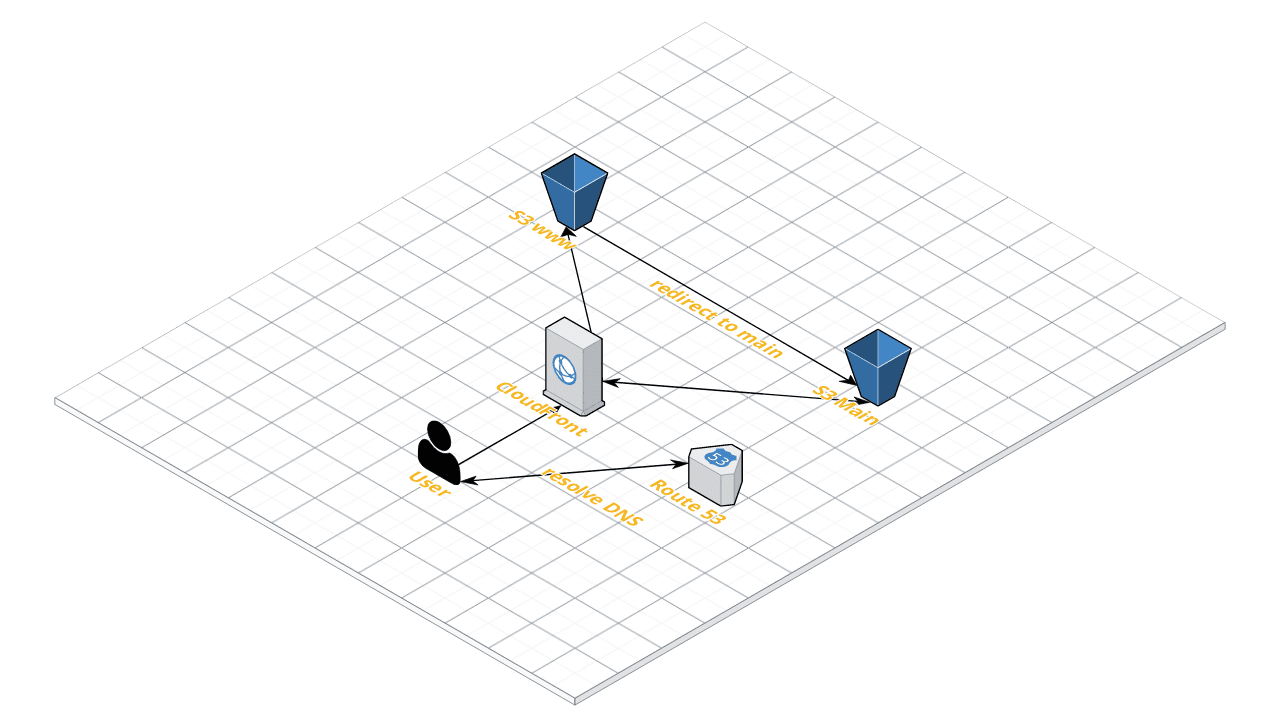
Below is a diagram to help visualizing how the parts work together.
Now, here I’d like to mention that there are couple of things you have to keep in mind when following their guide.
Comments on configuration
S3 Buckets
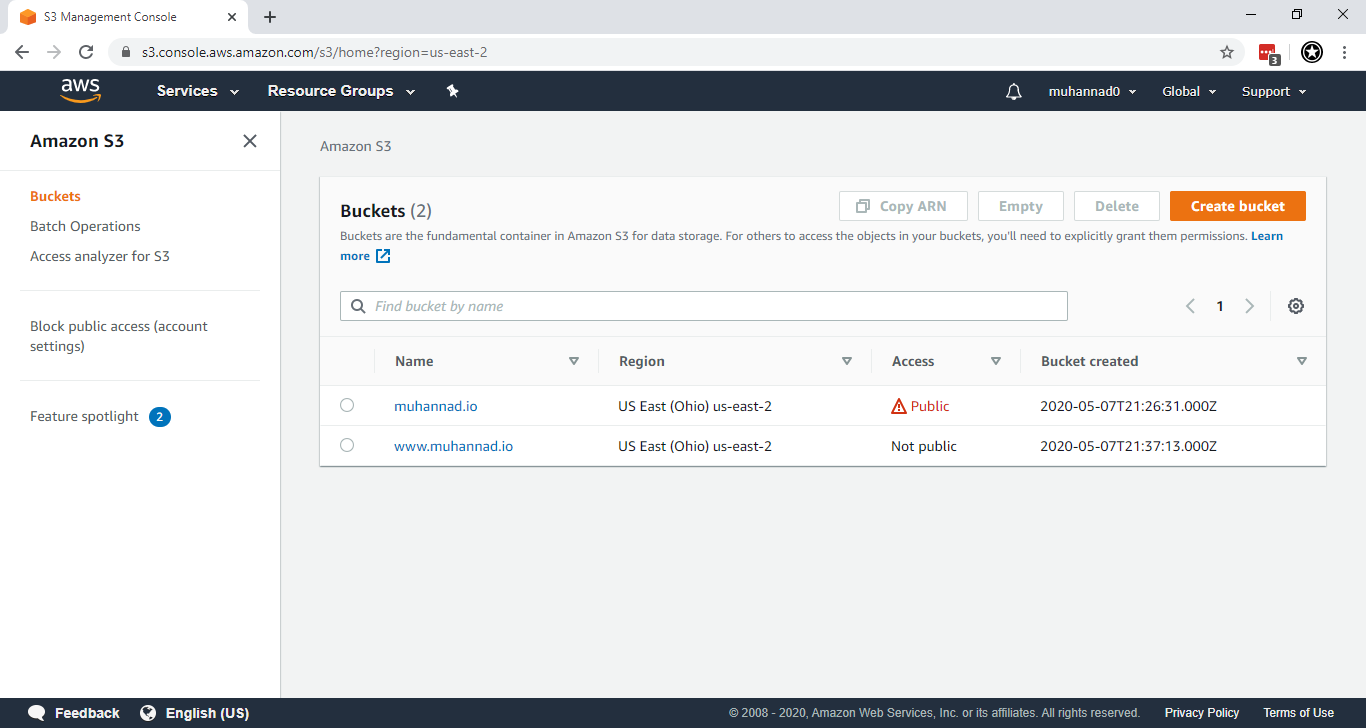
I used 2 buckets, one main and one for www subdomain (which just redirects requests to main). Public access is enabled on the main bucket only.
SIDE NOTE: I skipped creating a logs bucket for now. Maybe I’ll get to enabling logging later on.
Domain Configuration
Since I’m using another provider, I used CNAME records to point my domain to the correct endpoints.
Example:
example.com.or@–>CNAMErecord pointing to S3/Cloudfront endpoint.www.example.com.orwww–>CNAMErecord pointing to S3/Cloudfront endpoint.
Cloudfront with SSL Configuration
This is where I started tripping up. I started getting 403 errors and strange redirects when accessing the generated Cloudfront URL.
Couple of hours went by Googling for fixes and turns out I mostly I missed reading the help texts when filling out the fields. 😓
So I’d like to highlight couple of things to note before and while you’re working to enable Cloudfront.
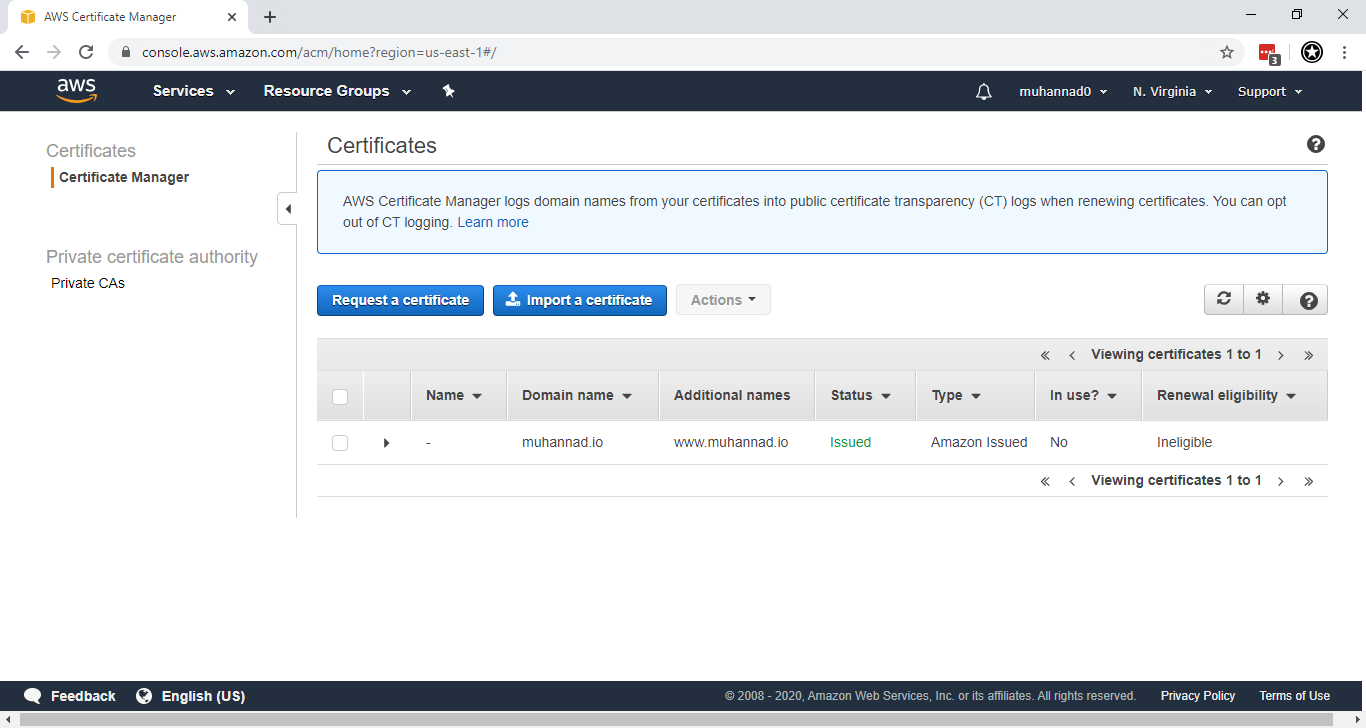
Get your SSL certificates ready first
Head over to ACM and follow the instructions to get a SSL certificate for your domain.
SIDE NOTE: When using DNS validation, make sure to remove the domain name from the generated name when creating CNAME records on your DNS provider. For example in _randomvalue.example.com. remove the .example.com. and just use the _randomvalue.
Once those are set, you can begin configuring Cloudfront. But here’s a couple of notes on doing that. I found some points that were not so clear in the official documentation.
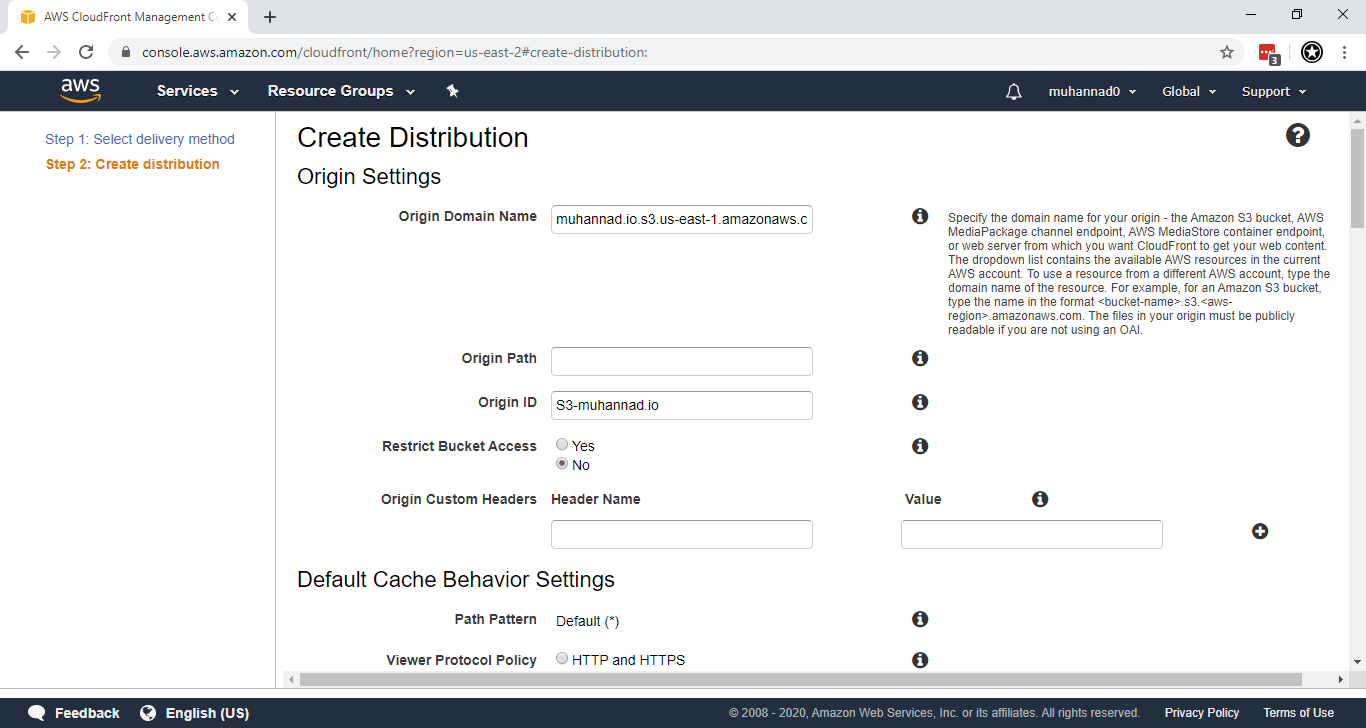
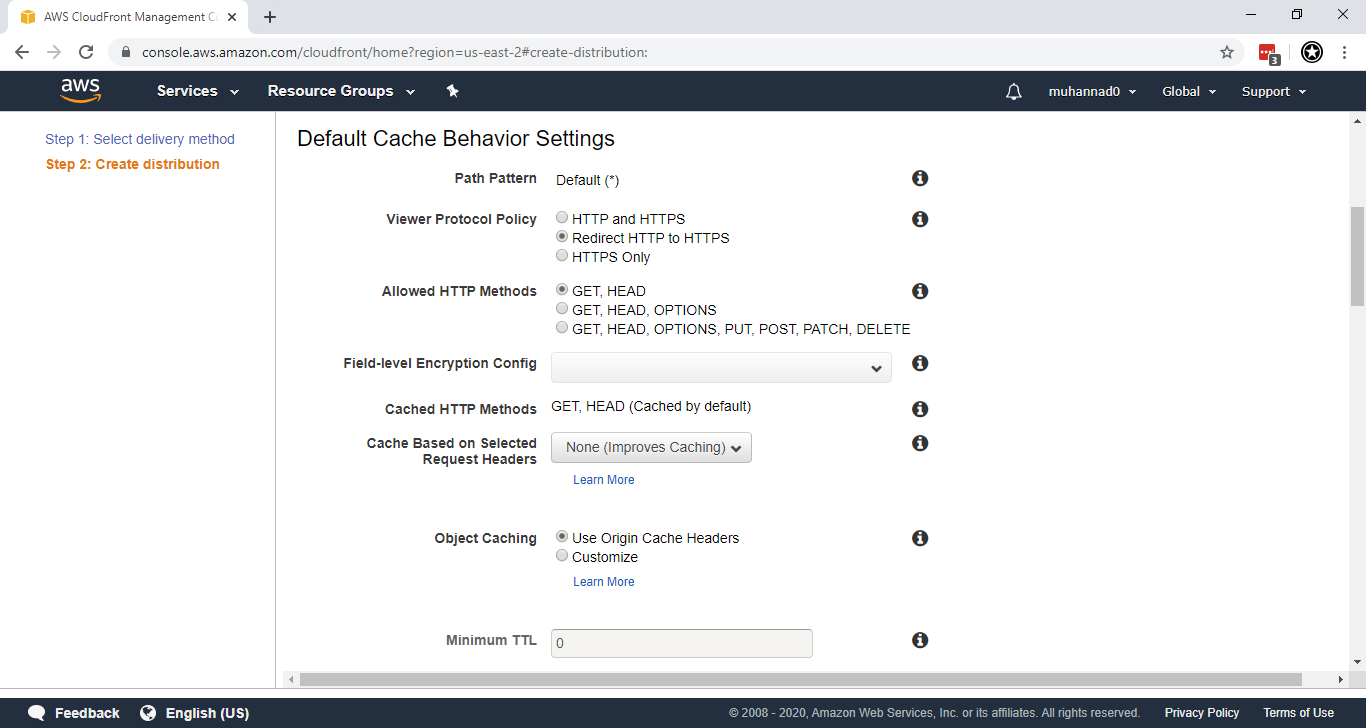
Origin Settings
Origin domain name should be in the format <bucket-name>.s3.<aws-region>.amazonaws.com.. If it’s not provided in this format, you would find that accessing the Cloudfront generated endpoint from a browser does a redirect to the S3 bucket endpoint.
Redirect HTTP to HTTPS
Since we want to secure our website, select this option.
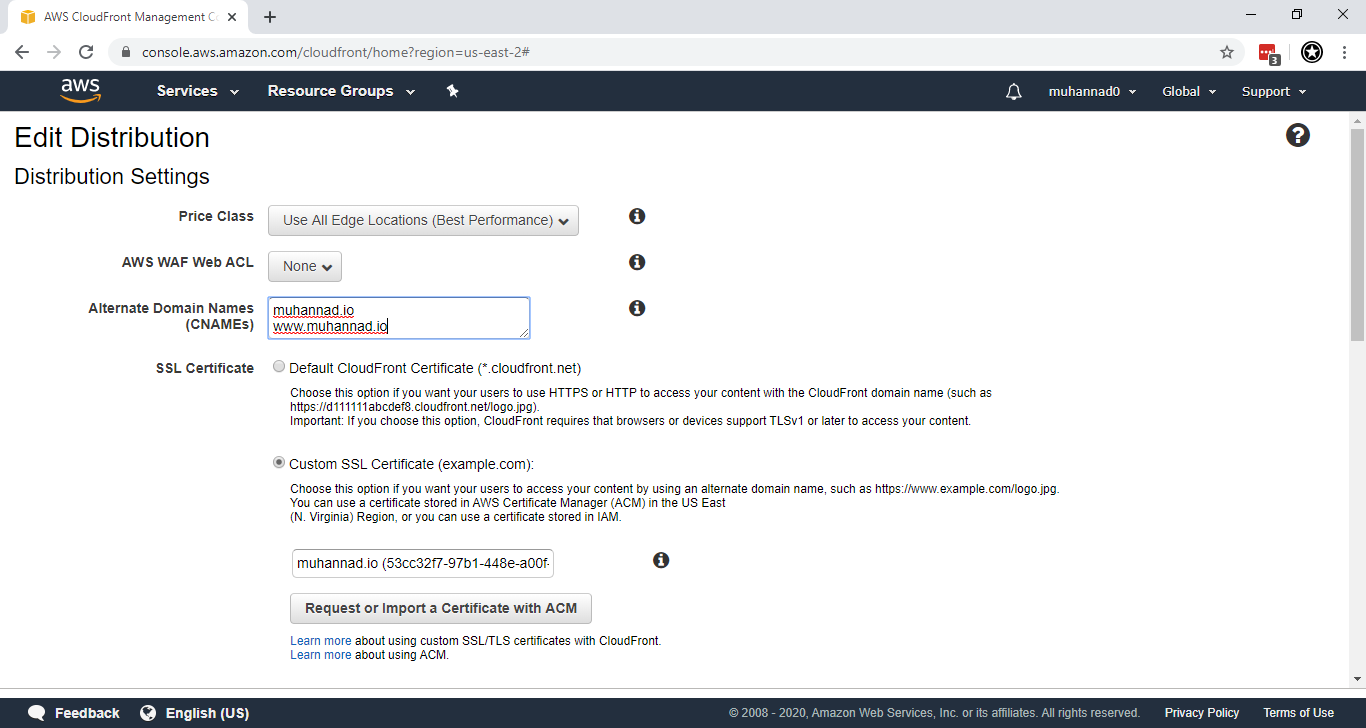
Enabling HTTPS with Custom Domain
To enable secure access with out custom domain, you need to provide Alternate Domain Names (CNAME) and select the Custom SSL Certificate option with the certificate created earlier in ACM.
Waiting for Cloudfront to finish
Once the settings are saved, Cloudfront starts configuring the CDN for your websites and provides an endpoint. You can first test whether everything works using the provided endpoint to access the website, before updating the DNS records.
Update DNS to Cloudfront
Finally, once everything is working fine update the DNS records for the domain to point to the Cloudfront endpoint provided.
Success!
If all went well, the webpage should now be accessible using your custom domain name.
Have a look at mine at muhannad.io 😄
Next phase should be interesting. It’s a development project again. But this time with a language and database I’ve never used. 😁