
AWS CloudFormation and Ansible: Provision and Configure EC2 Instances
About the Problem
I got to work on a small project that invovled spinning up development environments for a webservice that runs on a few EC2 instances on AWS. Initially, I started out using a CloudFormation template to create EC2 instances and used UserData with the commands to configure the instances with the required packages and settings.
But as with all projects in IT, requirements changed frequently. I got annoyed updating the CloudFormation template/stack each time and thought of decoupling the EC2 instances creation and configuration. I had been using Ansible for a while, so I decided to use playbooks to configure the instances and CloudFormation to create the EC2 environment.
Even though I had separated the infrastructure components and the configuration, I still needed both tools (AWS CLI and Ansible) to get the whole thing running. Then I found that there are a lot of Ansible modules, specifically for AWS. One of them was the cloudformation, which created the stack. So this meant I could create a playbook that looks like this.
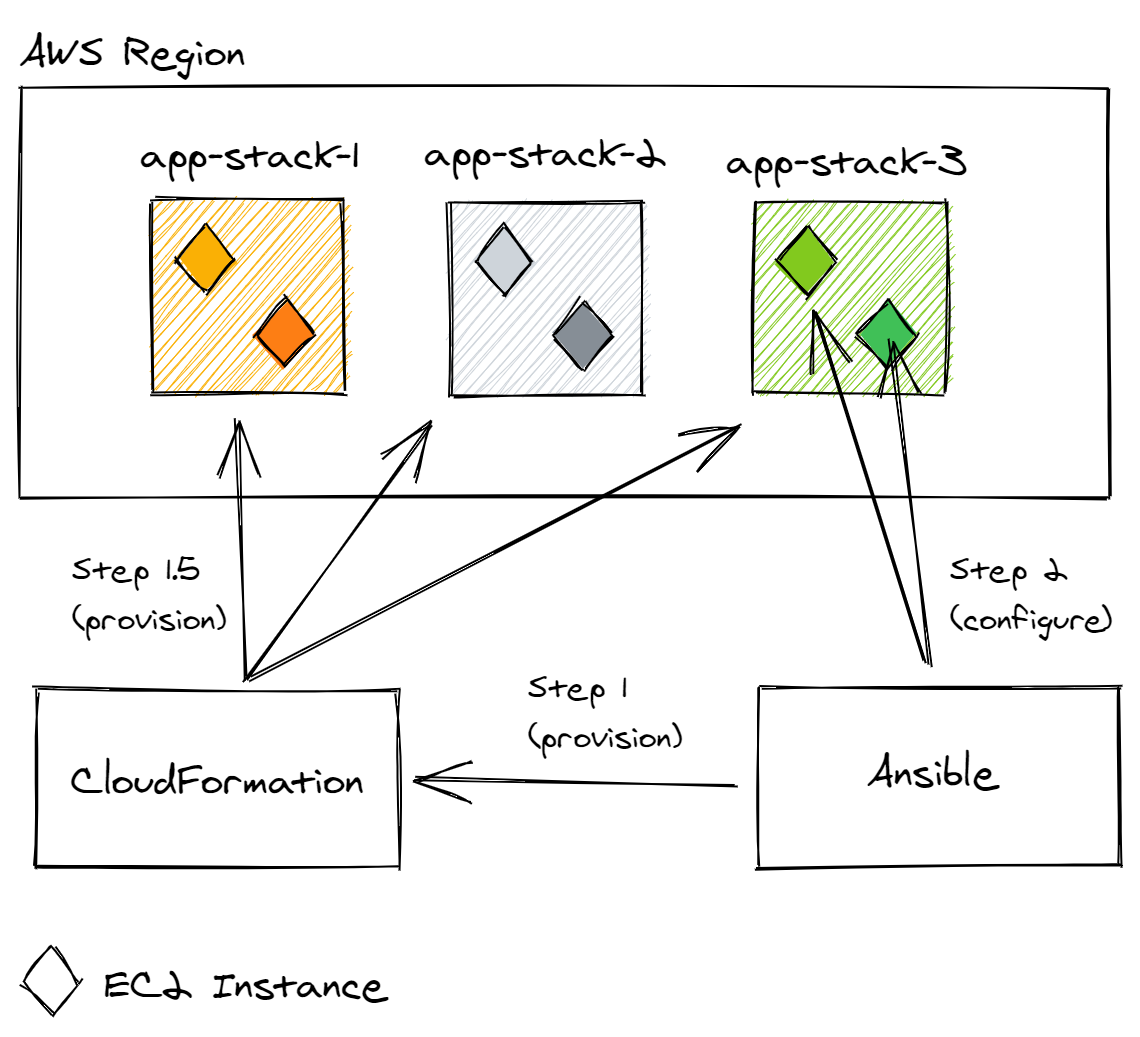
Finally, I had a playbook that can do both, create the CloudFormation stack to create the environment, and then continue to configure the instances. Let’s take a look at how I went about it.
Quick Introduction
CloudFormation is a service that allows you to define resources on AWS in a template file. The service takes care of figuring out how to provision those resources (for example, EC2 instances) for you. This helps us setting up individual resources manually on the web console or CLI and use a standard template that can repeatedly carry out the provisioning for us, automatically, error free and much faster.
Ansible is also a similar open-source tool, that automates provisioning and configuration. You can use it setup servers, configure Linux and Windows machines in an automated way. It also makes use of template files called playbooks that we can use to define the tasks that need to be run to provision and configure the system.
Prerequisites
-
AWS CLI installed and credentials configured on your machine.
-
Ansible installed on your machine.
-
Boto3 and boto Python packages installed on your machine.
-
Note: The commands mentioned in this guide are for Linux terminal.
It is expected to have basic knowledge on how to use Ansible and CloudFormation to follow this guide.
I found the following articles helpful when starting out using these tools.
What are we building?
As mentioned earlier, we are creating instances for a web application and database. This is meant for a quick dev/test environment that can be discarded once used.

Use an SSH key pair to access the instances
We need to create an SSH key pair that we will be using to access the EC2 instances once they’re deployed.
Let’s use the AWS CLI to create a key pair and save it.
aws ec2 create-key-pair --key-name my-key-pair --query 'KeyMaterial' --output text > my-key-pair.pem
In order to use this key with an SSH client, use the following command to set the permissions.
chmod 400 my-key-pair.pem
CloudFormation Template
This is the template that we will be using to create 2 EC2 instances, 2 Security Groups. We will be deploying them to the default VPC subnet.
In our working directory, let’s create a file with the name cfn-template.yml.
Parameters
The template takes in a few parameter inputs:
KeyName: name of the key pair we created in the first step. You could also give an existing key pair name.InstanceType: this is the type of EC2 instance.SSHLocation: the current public IP from which you’re running the playbook, so that we can SSH into the instances.
# cfn-template.yml
AWSTemplateFormatVersion: "2010-09-09"
Description: Setup test environment with EC2 instances

Parameters:
  KeyName:
    Description: Name of an existing EC2 KeyPair to enable SSH access
    Type: 'AWS::EC2::KeyPair::KeyName'
  InstanceType:
    Description: EC2 instance type
    Type: String
    Default: t2.micro
    ConstraintDescription: must be a valid EC2 instance type.
  SSHLocation:
    Description: The IP address range that can be used to SSH to the EC2 instances
    Type: String
    MinLength: 9
    MaxLength: 18
    Default: 0.0.0.0/0
    AllowedPattern: '(\d{1,3})\.(\d{1,3})\.(\d{1,3})\.(\d{1,3})/(\d{1,2})'
    ConstraintDescription: must be a valid IP CIDR range of the form x.x.x.x/x.
Mappings
We add mappings so that our EC2 instances can select the required AMI. This allows a bit of flexibility as we would just add/change the region/AMI ID here, and reference the value in the ImageId property of the EC2 definition.
Mappings:
  RegionMap:
    us-east-1:
      HVM64: ami-02354e95b39ca8dec # use Amazon Linux 2 (64-bit x86)
      # HVM64: ami-0ac80df6eff0e70b5 # Ubuntu Server 18.04 LTS (64-bit x86)
Resources
We have named resources here so that they can be referenced in other parts of the template.
- The 2 Security Groups with their ingress rules.
WebInstanceSecurityGrouphas allowed incoming HTTP and SSH requests.DbInstanceSecurityGrouphas allowed incoming MySQL from theWebInstanceSecurityGroupand SSH requests.
Resources:
  WebInstanceSecurityGroup:
    Type: AWS::EC2::SecurityGroup
    Properties:
      GroupDescription: Enable Web/SSH Access
      SecurityGroupIngress:
        - IpProtocol: tcp
          FromPort: 22
          ToPort: 22
          CidrIp: !Ref SSHLocation
        - IpProtocol: tcp
          FromPort: 80
          ToPort: 80
          CidrIp: 0.0.0.0/0

  DbInstanceSecurityGroup:
    Type: AWS::EC2::SecurityGroup
    Properties:
      GroupDescription: Enable DB/SSH Access
      SecurityGroupIngress:
        - IpProtocol: tcp
          FromPort: 22
          ToPort: 22
          CidrIp: !Ref SSHLocation
        - IpProtocol: tcp
          FromPort: 3306
          ToPort: 3306
          SourceSecurityGroupId: !GetAtt WebInstanceSecurityGroup.GroupId
-
The 2 EC2 Instances,
WebInstancefor web application andDbInstancefor database. -
Here we use
UserDatato update the OS and Python packages on boot up.
  WebInstance:
    Type: AWS::EC2::Instance
    Properties:
      InstanceType: !Ref InstanceType
      SecurityGroups:
        - !Ref WebInstanceSecurityGroup
      KeyName: !Ref KeyName
      ImageId: !FindInMap [ RegionMap, !Ref "AWS::Region", HVM64 ]
      Tags:
        - Key: "os"
          Value: "linux"
        - Key: "env"
          Value: "dev"
        - Key: "app"
          Value: "web"
        - Key: "deploy"
          Value: "ansible"
      UserData:
        Fn::Base64:
          Fn::Sub: |
            #!/bin/bash -xe
            sudo yum update -y
            sudo yum install python-pip -y
            sudo pip install --upgrade pip
            sudo pip install --upgrade setuptools

  DbInstance:
    Type: AWS::EC2::Instance
    Properties:
      InstanceType: !Ref InstanceType
      SecurityGroups:
        - !Ref DbInstanceSecurityGroup
      KeyName: !Ref KeyName
      ImageId: !FindInMap [ RegionMap, !Ref "AWS::Region", HVM64 ]
      Tags:
        - Key: "os"
          Value: "linux"
        - Key: "env"
          Value: "dev"
        - Key: "app"
          Value: "db"
        - Key: "deploy"
          Value: "ansible"
      UserData:
        Fn::Base64:
          Fn::Sub: |
            #!/bin/bash -xe
            sudo yum update -y
            sudo yum install python-pip -y
            sudo pip install --upgrade pip
            sudo pip install --upgrade setuptools
Tagging
This is a very important step, tagging your resources with the right values. This helps us identify what this resource is and to which project/app/environment it belongs to. We will be using tags to correctly group the instances so that Ansible can run the correct tasks on each one.
      Tags:
        - Key: "os"
          Value: "linux"
        - Key: "env"
          Value: "dev"
        - Key: "app"
          Value: "db"
        - Key: "deploy"
          Value: "ansible"
Outputs
We can add few outputs of the resources so that they can be referenced by another template if needed.
Outputs:
  StackName:
    Value: !Ref "AWS::StackName"
  WebInstanceDNS:
    Value: !GetAtt WebInstance.PublicDnsName
  DbInstanceDNS:
    Value: !GetAtt DbInstance.PublicDnsName
  WebSecurityGroupID:
    Value: !GetAtt WebInstanceSecurityGroup.GroupId
  DBSecurityGroupID:
    Value: !GetAtt DbInstanceSecurityGroup.GroupId
Ansible Playbook
This is where Ansible comes in with a playbook to automate creation of the CloudFormation stack. We’ll create a provision.yml file and start writing our playbook.
The first play is where we do our provisioning tasks. This run on the localhost (since our AWS CLI credentials are available in the local machine). We also set the variables required by the CloudFormation template.
# provision.yml
---
- name: Provision AWS
  hosts: localhost
  gather_facts: false
  connection: local
  vars:
    region: us-east-1
    instance_type: t2.micro
    keypair: my-key-pair
    ssh_location: 1.2.3.4/32
    stack_name: webapp-dev-stack-1
Provisioning the stack
We create our first task where we use the cloudformation module in Ansible to create a stack.
The parameter values are referenced from the variables set earlier. This makes it more flexible to run the playbook based on different requirements.
  tasks:
    - name: Create cfn stack
      cloudformation:
        stack_name: "{{ stack_name }}"
        region: "{{ region }}"
        disable_rollback: true
        state: present
        template: "cfn_template.yml"
        template_parameters:
          KeyName: "{{ keypair }}"
          InstanceType: "{{ instance_type }}"
          SSHLocation: "{{ ssh_location }}"
        tags:
          stack: "{{ stack_name }}"
Getting the deployed instances information
Once the stack creation is finished, we run the second task to get the information of the EC2 instances created. The ec2_instance_info module allows us to query AWS to the required information.
Remember the tags we used earlier, this is how we use the filters parameter to identify those instances. Once all the instances are queried, we add them to a list ec2_list that will be used in the next task.
    - name: Get ec2 instances info
      ec2_instance_info:
        region: "{{ region }}"
        filters:
          "tag:stack": "{{ stack_name }}"
          instance-state-name: [ "running" ]
      register: ec2_list
Adding the instances to inventory
Since the EC2 resource creation is dynamic, which is why we queried and got the list of EC2 instances in our ec2_list earlier. We can loop through items in this list and add it to an in-memory inventory that Ansible can use in the next part of the playbook.
- Using the
loopkeyword, we can run theadd_hosttask for each item in theec2_list. - Instance information is stored in the key
instanceswhich is how we are referencing with{{ ec2_list['instances'] }}in theloopvalue. - We get the instances properties using the format
"{{ item.property }}"and reference them in the proper parameters. - Note how we are adding the host to
groups. We have set a few groups so that we can classify these hosts and decide which tasks to run on specific groups. Here, we’re using theenvandapptag values as groups.
    - name: Add instances to inventory
      add_host:
        name: "{{ item.public_dns_name }}"
        ansible_user: ec2-user
        host_key_checking: false
        groups: "aws,{{ item.tags.env }},{{ item.tags.app }}"
      no_log: true
      when: ec2_list.instances|length > 0
      loop: "{{ ec2_list['instances'] | flatten(levels=1) }}"
Configuring the Instances
The next section of the playbook is where we target specific hosts and run the tasks to configure them.
- We’re going to create another play, that targets the
awsgroup of hosts (which would match all the EC2 instances we added to inventory earlier). - We have set a variable
ansible_ssh_common_argsto ignore the host key checking for testing purposes (as we are frequently running this playbook for testing) wait_for_connectionmodule is used to ensure that the instances are reachable.
- hosts: aws
  gather_facts: false
  vars:
    ansible_ssh_common_args: "-o StrictHostKeyChecking=no"
  tasks:
    - name: wait for instances to become available
      wait_for_connection:

    - name: Gather facts for first time
      setup:
Running the Playbook
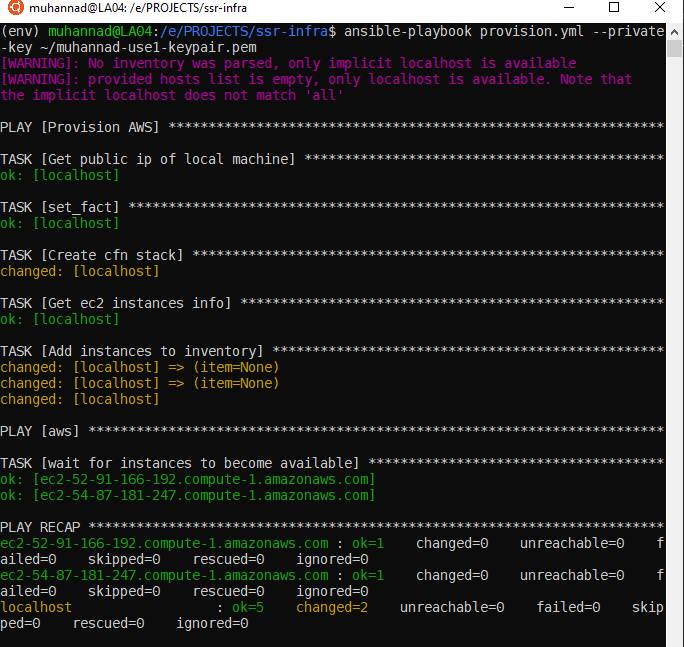
In order to run the playbook we use the ansible-playbook command.
ansible-playbook provision.yml --private-key my-key-pair.pem
-
We have provided the option
--private-key my-key-pair.pemso that Ansible uses specifically this key to access the instances. -
The progress is shown on the terminal.
- We can deploy more stacks afer changing the variable
stack_namein the playbook.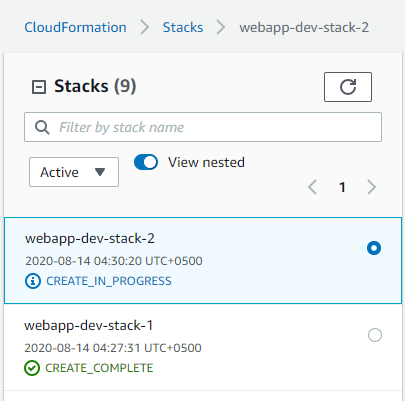
Next Steps
Now that we have our instances ready, we can have other plays that continues to configure these instances.
For example we can target the web group to setup the web application as shown below.
- hosts: web
  gather_facts: false
  vars:
    ansible_ssh_common_args: "-o StrictHostKeyChecking=no"
  tasks:
    - name: install nginx
      yum:
        ...
    - name: setup app
      ...

- hosts: db
  gather_facts: false
  vars:
    ansible_ssh_common_args: "-o StrictHostKeyChecking=no"
  tasks:
    - name: install mysql
      yum:
        ...
    - name: configure database
      ...
There are a number of ways such as a single playbook or making use of roles. This guide won’t go to the details of how Ansible does it’s configuration as that is a whole post on it’s own. Stay tuned for the guide specific to Ansible playbooks and roles.
Conclusion
To recap, we have seen how CloudFormation template is used to create the resources on AWS. We have also written an Ansible playbook that uses that template to create a stack on AWS, query and add the created instances to an in-memory inventory. We can now target hosts in that inventory with other plays that does the configuration.
With this method, CloudFormation ensures that the required resources are present and organized in stacks, while we can configure the guest OS on the instances with Ansible as much as needed. We are also able to quickly discard of all the resources once we are done with it (as the phrase goes… “Cattles, not Pets”).
If you found this guide helpful or have any feedback @ me on Twitter.